well its been a while since iv posted anything but the beast has slowly been coming right.
after finally figureing out how to get the brakes working again (replace both very rusted front brake cylinders) iv been looking over what is left to do and came up with two big things
1. fix the gears which have slowly been getting more and more crunchy and
2. replace the rear suspention
unfortuneately iv hit a time in my life when the heart is willing but the bank balance isnt, so instead of bricking her up, loosing all motivation to complete her and watching her slowly rot into the landscape i hit upon a novel idea, now i know that im unable to complete her in my present state so instead of just stopping i intend to sell her.
oh no!! how could you! i hear you cry, well dont panic just yet because you havnt heard my cunning plan yet. yes im selling her but only so i can trade up to another mini... namely one without all the costly gear trouble (im sorry but R1000 just to take a look at the box is just too much for me at the moment:( )
and yes i know im taking a massive risk on getting a new mini without knowing whats wrong with it, but now i am at least able to crawl my way through her and find out hopefully before i buy her!
so farewell to one old freind but keep an eye out for the new model coming soon!!
as always drive safely
Wednesday, February 4, 2009
Thursday, September 18, 2008
Hmmm... engine work, my fav-o-rite

Otherwise known as "how to spend lots of money by being stupid"
just so you know all or this happened around June/July-ish.. now i was involved in a car accident (on my side at least) in February of this year resulting in two nicely fractured legs and buckets of pain! on the up side it was my sisters car not mine! the down it wasn't insured!! (a lesson to all of you out there!! GET INSURANCE!! especially if you're going to let your crazy brother drive your car ;) but another upshot was that i was able to nick the battery out of her car for mine! (sneaky yes, but hey it was going to the scrap yard!!)
and now for your second lesson of the day, never ever ever EVER work on your car when you are tired! (don't go getting ahead of me now!) so i got back from work having snuck out at lunch to hijack the battery from my sisters bug that was lying downstairs, now it had been a long day and i was tired so you'll have to forgive me, but i was so excited to get my new toy into her i went rushing out, opened up the boot tossed out the old battery and popped in the shiny new one.
it was at this point i made the most basic and retarded mistake i possibly could! i hooked the battery up backwards!!
now anyone who knows anything about a car battery knows that in order to prevent idiots, such as yours truly, from doing this the terminals are different sizes, one big for positive one small for negative, but in my exhausted little mind all i could think was, "hmm wont go on! must change terminal!!" and so i did.
and if that wasn't bad enough you'd think the little sparks flashing about the terminals would of triggered some kind of "stop-what-you-are-doing!!!" mechanism in my brain! but nope, sorry, too tired!
Now here's a nice opportunity to study the effects of miswiring a battery in a car!
first off you get one or two little sparks around the terminals, this is your "disconnect NOW!!" warning
next you'll notice funny buzzing noises coming from under the bonnet, this is your "you're in trouble now!!" warning
after a short while this buzzing will be replaced by a new popping noise! and if you haven't soiled yourself yet and gone diving into the boot to disconnect that battery now you may as well kiss your car goodbye cos you've just blown all the major electrical components in your car!!!
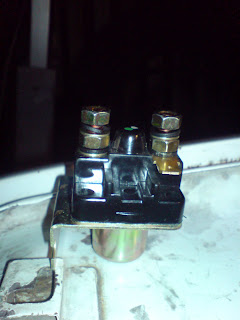
yup that's right, here's the list of part that i managed to destroy:
1 x rectifier (blew all the diodes right off!!)
1 x starter solenoid
1 x ignition coil
amazingly that's all!! but they add up to quite a hefty bill!!
stay mini!! (and don't work too late!!)
Thursday, September 11, 2008
first encounters
First days work, how exciting :D i figured that it would be most logical to start on her working from the ground up (you probably have a better way but this seems to work for me) so, i got her up on a jack grabbed a wheel spanner and my handy haynes manual (what a lifesave thats been!! in fact heres a link to a site where you can get one!- http://www.minimania.com/web/Item/646/invDetail.cfm or http://www.kalahari.net/books/Haynes-Restoration-Manual-Mini/657/1310853.aspx)
and off i went. Starting with checking the brakes and hub bearings, the first rear passenger wheel came off easily enough, just undo the wheel nuts slide off the wheel and remove the brake outer drum, clean out the brake dust (carefully!! you dont want to be breathing that stuff in!) and check the wear on the brake itself isnt too low, check check and check all ok there, then i moved to the front passenger, wheel off drum off cleaned out all ok.. now hub bearings, remove hub cap... ok sure...
5 minuites later i fetched my 'general purpose negotiating machine' otherwise known as a hammer and a good strong flat screwdriver, and i mean STRONG!! those caps are fitted tight so you are in for a fight, once thats off you should see a fair amount of old grease and hopefully a bearing or two a good doseing of degreaser (even the cheap ones work great so dont worry about brands here!) and a dolop of new grease over them did the trick nicely, but be warned!! the front hub has two of these sneeky little devices! so make sure you get the one at the back too, again now worries about damage so everything goes back together nice and happy.
and then i opened up the rear drivers side brake drum! and oh dear!! some one had forgotten to change the pads so the metal holding the pad had dug into the lining ot the drum itself cutting a nice big groove into the lining!! so i hauled the whole hub assembly off the car and took a trip into a nice chap just down the road from work who for a very reasonable sum (R100 or so if i remember correctly) was able to grind out the groove and fit shiney new brake linings to the brake shoes! yaay!!
unfortunately he applied slightly too much lining to the shoe and when it came to fitting the drum back over the brake assembly suprise suprise it didnt fit!! just as well they are brake pads, a little jiggling and alot of swearing later i had managed to get the drum back on the car, yes the brake was a tight fit but they will wear down quite quickly, or so im told. hey what do i know, its the first time im doing this! :D
now on to the final tyre!!
hurra... oh hmm its a little close to the top of the wheel housing! in fact i cant even fun my hand over the tyre its so close!! something must be wrong.
and there was, it took me almost 2 weeks to find out what but it would seem someone didnt line up the suspention too well, now if you dont already know the mini's suspention (well in mine atleast) consists of a fat little rubber donut (its actual name by the way) sitting atop a metal alloy trumpet (also its actual name) unfortuneately my trumpet had somehow slipped and had distroyed itself, hence there was no suspention at all on the front right hand side!! so off to mini spares and accessories in pinetown to find a replacement. just as well the trumpet had distroied itself because whn i pulled everything out i realised that the rubber cone was completely worn out too!! and where theres one worn cone... well you get the idea.
so i had to replace both front suspention cones and trumpets, but why replace when you can improve!! so in went 2 new hi-los aswell.
now i say all of this with much ease because, well its easy to say, but if you have plans on doing this yourself you need to know it much harder than you think!!! a quick read through some of the posts on the mini resourse discussion forum will give you an idea! (http://www.miniresource.com/forums/index.php?showtopic=22889) theres alot of energy stored up in those cones so you need a compression tool (m14 threded rod and 3 nuts with a peice of tube that will fit over the rod and some thick washers are the cheap option though) and even then it can be murder getting all the components apart!
the trumpets and cones have a tendency to stick together, this is a good thing seeing as they hold the car up but can be just a little frustrating when you want to replace a part with out distroying the other one!
so now she's sitting nice and level(ish - i still need to do a final adjustment to the hi-los) and looking very pretty indeed!
now i just need to get her running again.. shouldnt be too hard right ;)
stay mini :D
Wednesday, September 10, 2008
The Work begins

Ok so I've got my mini, now what...
well this is when i sat down and decided what i wanted to do with her. (this is a good exercise to do before any project you embark on, even if you change your mind later on!)Get her running obviously but aside from that i wanted something different something that told people something about me. So here's what I decided my goal was:
1. I wanted to fix her up on the inside to look as original as possible but with 1 or 2 minor modifications, such as a wood paneled dashboard.
2. I wanted to improve on her safety, this means disk brakes all round and the instillation of a roll cage as well as improving the visibility of the lights and vehicle as a whole
3. Replace the engine with a more powerful one, yeah ok 1275cc is lots of power for a mini, but what can i say... so after a little research i settled on replacing the A-series hulk with a nice little 225hp Honda motor, now this is going to be a tight squeeze as well as cost me the most out of any mod i could do to her so some things here may have to change or get moved around to suit.
4. as much as i like the original old english white paint scheme its gotta go!! the paints old and cracked and i really like some of the new colours going onto cars these days, and seeing as i will be the one looking at her the most (not to mention the one who actually owns her!!) i think a change is in order, i recon a nice bright red would look absolutely stunning on her! how about you
5. now this one comes into the safety/performance category, minis are renowned for their amazing handling and driveability! this said upgrading the suspension with hi lo's (basically a big threaded rod that makes raising and lowering the suspension real easy) as well as adjustable shock absorbers could be fun (hey whoever said you cant improve on perfection)
6. Do all of this while spending as little money as i can, like my ex-boss said i ain't Rockefeller, I'm the other feller!!
so that's my basic plan. now before you get all "hey you said you would do that and you didn't" on me remember this is a first off plan!! not a final set-in-stone-this-is-whats-happening-and-nothing-can-change-it plan!! so if i happen to change my mind about something hey, i changed my mind, it is my car after all isn't it??!!
so if you have any ideas about what might make her even better or think somethings a bad idea please let me know, who knows you may come up with something i haven't even thought of!!
so till the next post stay mini!! :D
Tuesday, September 9, 2008
First off the basics

now there are allot of different kinds of mini out there, from the Austin 850cc mark 1 to the 1275cc mini coopers. Now I'm not going to go into all the different makes but a quick search on wikipedea should give you a good idea of just how many there are.
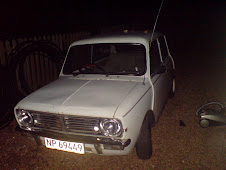
The Beast is a South African produced 1982 mark 3 1275E in Old English White (I know its the original paint because its badly cracked and flaking in places) paint code (711-3925)
(If you're looking for your paint code then try this link (http://www.miniresource.com/paint.php) these are the original British codes so they may not work if you getting your paint from a different source, all the same its nice to know)
She lived a fairly sheltered existence until the last owner got hold of her (University students and minis are usually a bad mix!!) her engine was replaced with another 1275 unit and she ran on that for a bit before being parked in the guys driveway. And there she lay for a few years being used every now and then for the odd shopping trip, unfortunately she was kept outside and as a result has suffered from a little rust in spots here and there but over all shes doing very well considering (quite a tribute to her sturdy construction I'd say)
At this point i met her then owner and arranged to buy her so in June 2008 myself and my father made the short drive up to Petermaritzburg to go and collect her. Unfortunately she was in no state to be driven so we tied her onto the back of the ford ranger and off we went.
The return trip was fairly uneventful and asside from a brief stop to ensure that everything was still attached she arrived in my driveway safe and sound!!
It was at this point that all the real fun began!! but I'll have to keep you in suspense for just a little longer and save that for another post :D
till then stay mini
Welcome
Hi
Welcome to the first post in my attempt at chronicling my exploits in mini mayhem.
Just so you know this is the first time i have ever attempted to rebuild a car, its also my first car and the first time I've ever done a blog.
Wow that's alot of firsts now i come to write it!! anyway what I'm trying to get at is that i pretty much have no idea what I'm doing so if i say or recommend something that you disagree with then please feel free to jump in an tell me I'm doin it wrong! you're probably right and your comments may help someone else further down the line with their project too!
So.. lets get started!
Subscribe to:
Posts (Atom)